Saturday, August 30, 2014

Send expression to function using Expression class

This trick is very useful when we want to execute different expressions within one single function where the function argument will remain unchanged.

The best example of the situation is Repository design pattern.  In Repository pattern, we can create single generic function, which will take expression as argument and execute on some context class. As per expression the query, will get generate and execute.

The Advantage of the method is that single generic function can able to server many expression. We will implement it shortly.

Let’s understand the class at first. The prototype of the class is

 public sealed class Expression<TDelegate> : LambdaExpression

Expression class has two version one concrete class “Expression” and another is “Expression<TDelegate>”  . In this example we will use the generic version of the class. Here we are seeing that Expression is taking TDelegate.

So, let’s implement example. Here is the simple model class which we will use in this class.

public class Person
    {
        public Int32 Id { get; set; }
        public string name {get;set;}
        public string surname{get;set;}
    }

Here is the context class of the application. We have inherit it from DbContext class.

 public class DataContext :DbContext
    {
        public DataContext() : base("ApplicationConn") { }

        public DbSet<Person> PersonEntity { get; set; }
    }

Let us generate database and migrate. Once we seed database it will create below table.

Now, let’s create one class and function which will take Expression as argument. Here is sample code.

public class myClass<T> where T : Person
    {
        public IDbSet<T> dbSet = new DataContext().Set<T>();

        public IEnumerable<Person> Fun(Expression<Func<T, bool>> where)
        {
            var person = dbSet.Where(where).ToList();
            return person;
        }
    }

We are seeing that Fun function is taking Expression as argument. The argument can be any expression, for example, LINQ query. We are using The Context class to fetch data from Database. Now, we will call the function and send argument. Have a look on below code.

class Program
    {
        static void Main(string[] args)
        {

            var myClass = new myClass<Person>();

            var person = myClass.Fun(f => f.Id == 1).ToList();
            Console.WriteLine("Person with Id =1 \n");
            Console.WriteLine(person[0].name + " " + person[0].surname + "\n\n");


            var persons = myClass.Fun(f => f.Id == 1 || f.surname == "Kumar").ToList();
            Console.WriteLine("Person whose Id = 1 and surname =Kumar");

            Console.WriteLine(persons[0].name + " " + persons[0].surname);
            Console.WriteLine(persons[1].name + " " + persons[1].surname);

            Console.ReadLine();
        }
    }

In first call we are sending one expression which will fetch person based on Id.  We are passing Id=1 and it will fetch person whose Id is 1.
In second class, we are fetching all person whose Id is 1 or surname is “Kumar” and obviously it will return two persons.
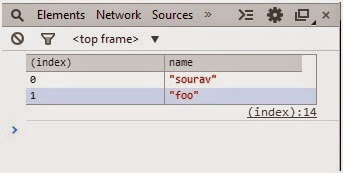
Here is sample output.


Monday, August 25, 2014

Console.log() Vs console.table() in JavaScript

To debug JavaScript application we use console.log() every now and then. We know that it logs the object in console of browser window what we pass as argument of log() function.  In this post we will learn the difference of console.log() and console.table().  I hope by seeing function name everyone can able to guess that console.table() will give some formatted output where console.log() does not. So, let’s see it in example.

Example of Console.log()
We have created one JavaScript object and trying to log the object in console of browser. In this example I am using chrome browser , If you are using old version if IE then you might get error where it will tell that “console is not defined”

       <script>
           var person = [
                        { name: 'sourav', surname: 'kayal' },
                        { name: 'foo', surname: 'bar' }
                        ];
           console.log(person);
       </script>


Here is the output; two objects are there but not in neat and clean presentation. 

Example of Console.table()
Now, we will use console.table() function to see the difference. The JavaScript is code is same as above.

       <script>
           var person = [
{ name: 'sourav', surname: 'kayal' },
{ name: 'foo', surname: 'bar' }
   ];
           console.table(person);

       </script>

The output is like below.  We are seeing that the data is presenting in table stricture. It’s easy to read and understand.


Not only formatted data, console.table gives more control on JavaScirp object presentation. If we want to print only one column, we can do it in this way.

         <script>
           var person = [
{ name: 'sourav', surname: 'kayal' },
{ name: 'foo', surname: 'bar' }
          ];
           console.table(person,"name");
       </script>
Here is output with only name column.

This trick may useful when you are working with large JavaScript object and analyze data for debugging purpose. 


Saturday, August 23, 2014

Understand SPA using AngularJS

Modern survey says that people like  equally to browse website from mobile phone as desktop and it is said that , people will browse web application more from mobile than desktop in coming days. Now, there are certain limitation in mobile browser, it’s display size, processing speed, native storage capacity are few of them.
To keep those minds, modern application turning into very lightweight API based formation rather than heavy weight post back in ASP.NET.  The concept of SPA(Single Page Application ) has introduces. The fundamental idea behind single page application is , “shell page or master page will load at the first time and page let will load in every next subsequent request”.

What is the advantage of it?
First of all , it will improve performance of application. As main page is not loading each time, the HTTP response will be much lighter. It may send JSON data or chunk of HTML in response body.  The scenario fit best in case of mobile-based application or the website where customer would like to visit it in mobile.

How to implement SPA ?
There is no straightforward answer for this question.  As SPA is a style , we can implement it in many ways. There are many awesome JS library in market which gives facility to implement MV* design pattern in client side. We can pick any one of them and can implement SPA or we can implement SPA with the help if JQuery AJAX library by making AJAX request to load page let.
In this example, we will use AngularJS to implement SPA application.  We know that AngularJS is a awesome library which gives MVC pattern in client side development. As this is not AngularJS article, we will directly jump into implementation without discussion much about angularJS but you will get advantage of you have hands on experience in angularJS.

Let’s start to implement
Take one web application in VisualStudio and try to implement below structure.  I like to create one app directory and dump all AngularJS related stuff there. The controller directory will contain controllers in angularJS and View directory will contain the page let, which is load on demand on master page.


Create master page


Here is the code for master page. It’s simple and self descriptive.
<!DOCTYPE html>
<html ng-app="mySPA">
<head>
    <title></title>
    <script src="http://ajax.googleapis.com/ajax/libs/angularjs/1.2.16/angular.min.js"></script>
    <script src="http://ajax.googleapis.com/ajax/libs/angularjs/1.2.16/angular-route.min.js"></script>
</head>
<body>

    <div style="height:50px;background-color:aquamarine;">
        This is Fixed header <br />
        <a href="#/aboutme"> About Me</a>
        <a href="#/contactme"> Contact Me</a>
    </div>
    <div ng-view="">

    </div>

    <div style="height:50px;background-color:aquamarine;">
        This is Fixed Footer <br />
    </div>

    <script src="app/app.js"></script>
    <script type="text/javascript" src="app/controller/aboutmeController.js"></script>
    <script type="text/javascript" src="app/controller/contactmeController.js"></script>
</body>
</html>
In header portion, we have give reference of angularJS and the route module of AngularJS. The route module will handle routing in application and it comes in separate package.


Create module and routing in application.
We know that module is the root node of Angular and in module node; we will attach all other nodes.  Here we have created ‘mySPA’  module and injected ‘ngRoute’ into it. The reason is, we want to use routing mechanism in this module.


'use strict'
var app = angular.module('mySPA', ['ngRoute']);

app.config(function ($routeProvider) {

    $routeProvider.when("/aboutme", {
        controller: "aboutmeController",
        templateUrl: "/app/view/about.html"
    });

    $routeProvider.when("/contactme", {
        controller: "contactmeController",
        templateUrl: "/app/view/contact.html"
    });
});

$routeProvider service provides service of routing. We are seeing that , when user will request for “/aboutme” path , the routing mechanism will load about.html page from view directory in master page and along with , it will execute aboutmeController.
Same will happen in case of “/contactme” path.

We will see that the, new page will not load but the page let will load in master page and url will point to fragment.

Create view pages
Just add two view pages called “about.html” and “contact.html” in view directory and add below code in both of them.

<div>
    {{message}}
</div>

Here , the message is a placeholder and the value will get set within controller.


Create controllers
Now, we will add two JS files in controller directory under app.  Both will act as controller of MVC framework. Here is sample code example.

This is the code for aboutmeControler. It takes one service called $scope and we are setting placeholder value within controller using $scope.

'use strict'
app.controller('aboutmeController', function ($scope) {
  
    $scope.message = 'Welcome to about me page';
   
});

Here is code for contactmeController. The operation is same like previous one , just message value is the difference.

'use strict'
app.controller('contactmeController', function ($scope) {
   
    $scope.message = 'Welcome to Contact me page.';

});


The purpose of setting both controllers is to show proper message when page let will get load in master page as per routing.

So, when user will load about me page , she should see the message associated with aboutmeController and when user will load contactme page , she should see the message which we have defined in contactmeController.

Let us browse contactme link and please observe the url, It’s still pointing to index.html page and the contactme page let has loaded in view area.

Now, if we browse , aboutme link, we will see the message which we have set in controller but the master page is still in url.


Conclusion:-

Now a days , SPA is really getting popular ,not only for mobile but also for web. So, as developer , one should learn to implement SPA to compete with modern web technology. I hope this article will give you fundamental idea of SPA using AngularJS.

Friday, August 22, 2014

Modify default ApplicationUser class of MVC5 template

Those who are new in default template of MVC5 they may feel uneasy to edit the login and module which is totally auto generated. It is not tough to extend the existing functionality. In this article, we will modify the default model class, we will add our own property, and it will reflect in database.

Prior knowledge .
We know that the MVC 5 default template use code first approach strategy for entity framework. So, to update the mechanism of default template you have to familiar with code first approach.  In this example, I am using VisualStudio 2013, which provides MVC5 template by default. If you are using any other lower version of Visual studio, you have to install template on your own.
Once you open visual studio 2013 and select web tab, you will find the default template.

Click on OK and it will pop up another wizard, which will ask you to select project type. Please select MVC application and individual user account in application. Selection of individual user account is needed to scaffold the application with proper code of authentication.
Once the application get create, you should see the below project structure. In MVC5 default template, we will see two classes.
They are AccountViewModel and IdentityModels. The AccountViewModel.cs file contains default model that is related to login module and IdentityModule.cs file contain the code related to data access mechanism using Entity Framework.
To edit the default login modul , we have to modify both classes. So, let’s open AccountViewModel at first. In this file you will find RegisterViewModel class which contains username , password and confirm password fields. Our aim to add another field called “Age” in this model and save value of the property in database. Here is the modified model.
public class RegisterViewModel
    {
        [Required]
        [Display(Name = "User name")]
        public string UserName { get; set; }

        [Required(ErrorMessage = "Please enter age")]
        [Display(Name = "Age")]
        public int Age { get; set; }

       
        [Required]
        [StringLength(100, ErrorMessage = "The {0} must be at least {2} characters long.", MinimumLength = 6)]
        [DataType(DataType.Password)]
        [Display(Name = "Password")]
        public string Password { get; set; }

        [DataType(DataType.Password)]
        [Display(Name = "Confirm password")]
        [Compare("Password", ErrorMessage = "The password and confirmation password do not match.")]
        public string ConfirmPassword { get; set; }
    }

 Now, let’s open IdentityModule.cs file and update like below.  As we have added Age property in model we have to add same property in ApplicationUser class.  In below the applicationDbContext class is defined for Entity Framework configuration.
using Microsoft.AspNet.Identity.EntityFramework;
using System.Data.Entity;

namespace MVC.Models
{
   
    public class ApplicationUser : IdentityUser
    {
        public int Age { get; set; }
    }

    public class ApplicationDbContext : IdentityDbContext<ApplicationUser>
    {
        public ApplicationDbContext()
            : base("DefaultConnection")
        {
        }

    }
}
The default constructor is taking the connection string called “DefaultConnection” which has defined in web.config file of the application. Please make sure that the connection string is pointing to right database and database server.  Please make sure that the VisualStudio is running in Administrator mode it needs to create database in DB server.
Hope the connection string setup is all fine , now let’s open AccountController and we will modify Register method as below.


Please have a look on highlighted portion. We are setting the Age property in time of object creation of ApplicationUser class. That is all and nothing to do much here.
Now, open Register.cshtml view from Account folder under view and add Age property to it. It will render age property in page. Here is the sample code.

We have completed the configuration part and now we will migrate database. As this is code first approach , we have to migrate database and then model change will reflect to database. Just run the below command in package manager console.

enable-migrations
This command will enable migration in application. You will find that Migration folder has created in application automatically.

add-migration <migration name>
This command will generate migration code in application according to current model state.

update-database
The command will reflect current model in database. You will find that the Age property has created just like below in AspNetUser table in DB server.


Moreover, that is all about configuration. Let’s run the application and navigate to register link. We will see that the default template has modified and Age field has added as like below.

Once we click on Register button the data should save in AspNetUser table just like below.

We are seeing that Age field has created and data is saving in the field.

Conclusion:-
 In this article we have learned to edit and update the Existing login module of MVC5 application. At first time it’s really little confusing to figure out the implementation and extensibility point but once you understand it’s easy and smooth.